

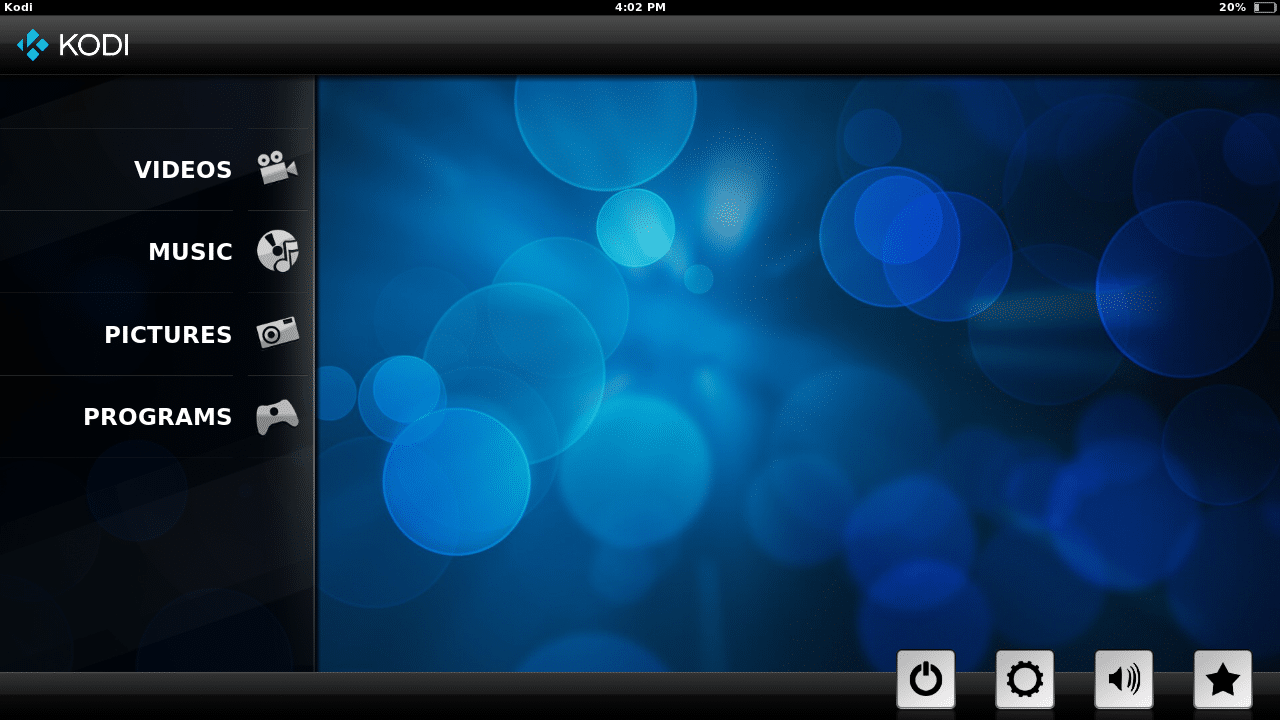
To help you figure out how to get Kodi on your smart TV, we've created this one-stop resource for installing Kodi on the most popular smart TV brands. Just click your smart TV's brand name on the table of contents below to find out what your options are for running Kodi.
After you read this guide you'll know:
- How to install Kodi on smart TVs from LG, Samsung, Sony and more
- Whether or not there's a native Kodi app for your smart TV system
- All the best workarounds for using Kodi on non-compatible smart TVs
How to run Kodi on LG Smart TVs
If you have an LG Smart TV, that means that you're stuck dealing with LG's oddball WebOS operating system. WebOS is different because it was originally designed to run on Palm PDAs. After smartphones made PDAs irrelevant, Palm went bust and LG ended up with the rights to WebOS.
In 2015, a Kodi fan asked the Kodi development team to work on a WebOS compatible version of Kodi. Several Kodi developers chimed in to say that Kodi will likely never come to WebOS because:
- It's too much extra work. Kodi and WebOS are both based on Linux. However, WebOS is totally different. Kodi's development team would have to basically rewrite Kodi to get it to work on WebOS.
- Not enough people use WebOS. Kodi's developers have a limited amount of time and resources, so they have to be choosy about the projects they take on. In their view, there are not enough people using WebOS to justify building a WebOS compatible version of Kodi.
- A Kodi app is not really necessary. Raspberry Pi and other similar set-top boxes provide a cheap and easy alternative way to use Kodi on LG smart TVs.
In 2017, yet another Kodi forum member submitted a request for a WebOS version of Kodi. This time, team Kodi replied with a single word answer: no.
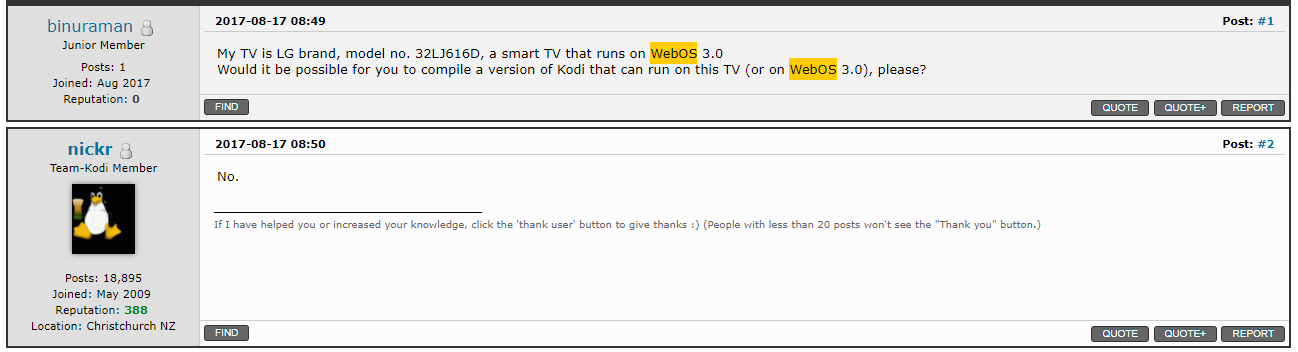
Kodi developers have zero interest in supporting LG's WebOS. Source: forum.kodi.tv
Because Kodi developers clearly aren't interested in rewriting Kodi for WebOS at all, the best way to get Kodi on your LG Smart TV is via some type of Kodi box. Or, you can cast Kodi from your phone to WebOS via Share Screen. If you don't like those options, you may want to consider switching over to Plex.
Connecting a Kodi box to your LG Smart TV
There are many different types of Kodi boxes on the market. I had a LG smart TV, I would get a Raspberry Pi. Raspberry Pi devices are cheap (about $30), fast and easy to use.
Raspberry Pi
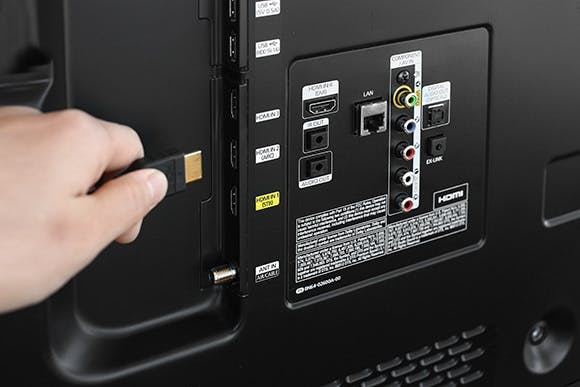
All LG smart TVs have HDMI support, so they're all Raspberry Pi compatible.
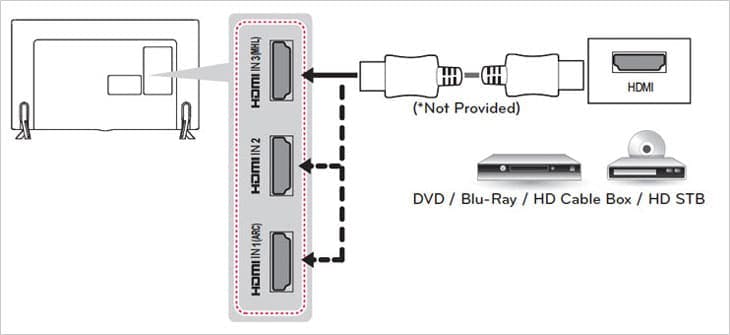
If your LG smart TV can accept multiple HDMI devices, you could connect more than one Kodi box to it. Source: LG
All you have to do to load Kodi onto a Raspberry Pi is:
- Format your Raspberry Pi card. Raspberry Pi comes with an SD card. Just pop the card into your Mac or PC and format it using the FAT32 format. (On a Mac, you can use the built-in Disk Utility tool to accomplish this step. PC users can install SD Foundation’s free SD Card Formatter utility.)
- Transfer Kodi onto the card. Download the Kodi-based operating system known as OpenELEC to your computer. Then, use some type of imaging tool to write OpenELEC to your Raspberry Pi card. (If you’re on a Mac, use ApplePi Baker. PC users can use the Win32 DiskImager tool.)
- Plug Raspberry Pi into your LG Smart TV. Flip on your Raspberry Pi and your LG Smart TV. Then, use the input picker function on your LG Smart TV to switch to Kodi.

Once you plug in your Raspberry Pi, use the input picker in WebOS to switch to Kodi. Source: YouTube
Nvidia Shield
In addition to Raspberry Pi, another excellent Kodi box is Nvidia Shield. Nvidia Shield has beefier specs compared to Raspberry Pi, so it can also be used for gaming. Additionally, Nvidia Shield runs Android.
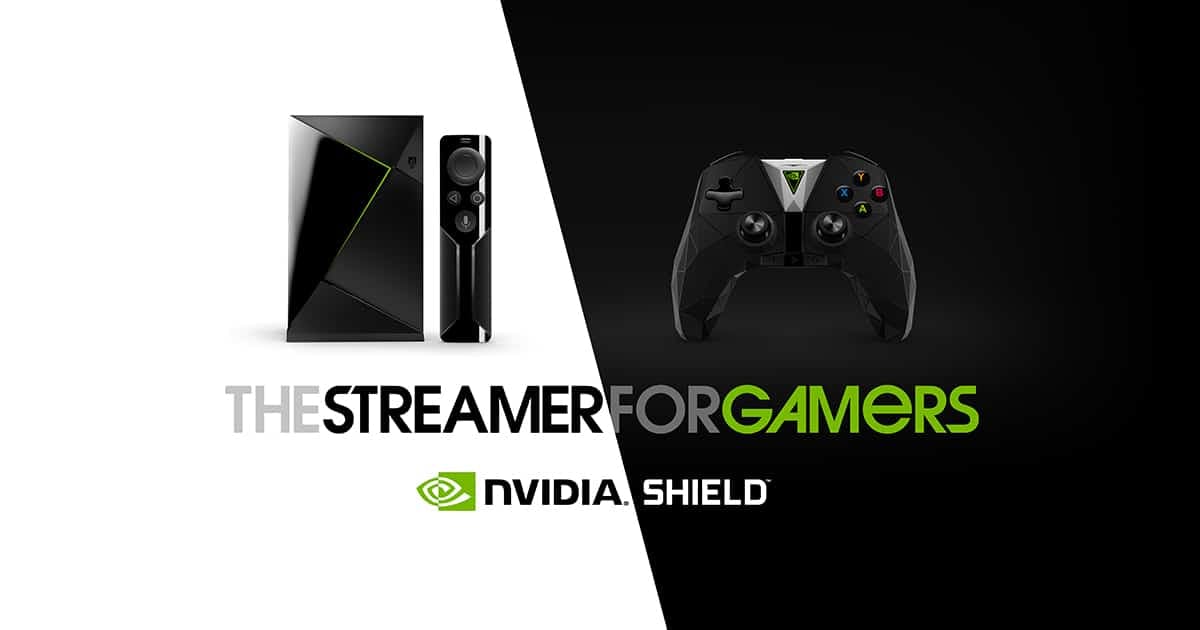
Nvidia Shield is great for Kodi and it can also be used to play games. Source: Nvidia
All you have to do to put Kodi on it is hop over to Google Play, search for Kodi and click the green install button.
Geek out with multiple Kodi boxes
Most LG Smart TVs have multiple HDMI ports. So, if you really wanted to nerd out you could plug in several different types of Kodi boxes. If you had all Raspberry Pi and Nvidia Shield, you could switch between them both with the click of a button. You could even get three different Raspberry Pis and install different Kodi builds on each one.
Kodi builds are modified versions of the core Kodi operating system. Kodi build makers equip their builds with themed artwork, customized menus, useful add-ons and lots of other cool stuff.
Using your phone and Screen Share to play Kodi
If you don't want to plug in a separate Kodi box, you can opt to cast Kodi from your phone to your LG Smart TV instead.
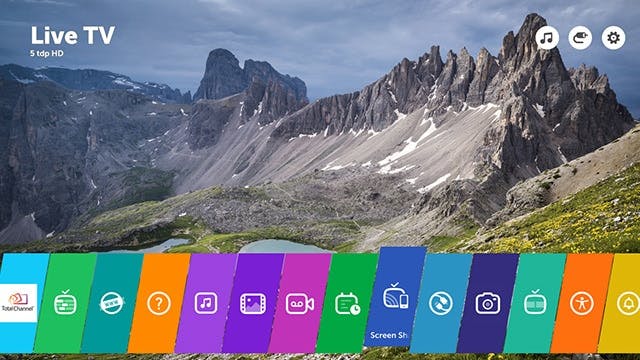
Every LG Smart TV that can run WebOS 2.0 and WebOS 3.0 has a "Screen Share" feature that allows you to mirror your mobile device's screen to your LG Smart TV.
Just open the Screen Share feature from the main menu of your LG Smart TV and go into listening mode. Then, tell your phone to look for your LG Smart TV. Once your devices connect, you can cast Kodi from your phone.
- Android: Some Android phones have a built in screen sharing feature called Miracast. On some Android devices, Miracast is called Cast Screen.
- Windows. Some Windows devices have Miracast too, but sometimes the same feature is called Wi-Di.
- Linux. Linux has a Screen Share compatible feature called OpenWFD.
- iOS. Unfortunately, iOS devices only have built-in support for Apple TV.
Kodi boxes offer better reliability and superior performance compared to Screen Share because an HDMI cable can deliver more audio and video data than a WiFi connection. Your Kodi videos may stutter and lag if you connect via Screen Share - but you won't have that issue if you get a Raspberry Pi or Nvidia Shield.
Use the Screen Share option to stream Kodi from your mobile device. Source: LG
Plex is available in the WebOS App Gallery
Yet another option for Kodi fans with LG Smart TVs is Plex. Plex is built from Kodi's source code and its player is very similar to Kodi's. The main difference between Kodi and Plex is that Plex is designed to give you access to all your files wherever you go.
Once you set up a Plex server on your main computer, you can use your Plex apps to stream your media files to all your devices. With the Kodi app, you're stuck with whatever files you have on your hard drive. There's no built-in feature that allows you to connect to your home network from within the Kodi app.
On the other hand, Plex isn't as customizable as Kodi. Plex does have plug-ins called channels, but they aren't as flexible as Kodi add-ons. Also, you have to pay for a subscription to unlock Plex's premium features. Still, Plex does have an WebOS app and Kodi does not - so that's a big reason to consider trying Plex if you already own an LG Smart TV.
How to run Kodi on Samsung Smart TVs
Samsung Smart TVs run on an operating system called Tizen. Tizen is an open source operating system with Linux roots. Many Samsung devices are shipped with Tizen, including a variety of different smartphones, tablets and smart TVs.
When a Kodi forum member asked about Tizen in September of 2015, Kodi developer da-anda responded by saying that the MrMC team is working on a port.
MrMC is a stripped down version of Kodi media player that's basically identical to Kodi, only it has no support for add-ons.
In February of 2017, MrMC developer davilla left a message in the MrMC forums indicating that there are a number of obstacles standing in the way of a Tizen compatible version of MrMC.
The main reason why work on Tizen seems to be going nowhere is likely the large amount of work needed to make a Tizen compatible version of MrMC a reality. According to davilla, the MrMC team will have to adapt 25 different C++ libraries to make MrMC work on Tizen.
- Background information: Code libraries are chunks of code that can be reused in different ways.
Even if the MrMC releases a Tizen compatible version of its player, it will probably never be very popular. MrMC is a bit boring because it lacks add-on functionality. All it does is play media files.
If you want to use Kodi with your Samsung, your best bet is to invest in a Raspberry Pi or some other Kodi box. Alternatively, you can use Samsung's Screen Mirroring feature to cast Kodi from your phone to your Samsung Smart TV.
Connecting a Kodi box to your Samsung Smart TV
In my personal opinion, Raspberry Pi is the best all-around device for setting up your own Kodi box. Raspberry Pi devices are very inexpensive (about $30), yet they are equipped with impressive hardware specs.
Raspberry Pi
All LG smart TVs have multiple HDMI jacks, so they're all Raspberry Pi compatible.
All Samsung Smart TVs have multiple HDMI ports. Source: Samsung
All you have to do to load Kodi onto a Raspberry Pi is:
- Format your Raspberry Pi card. Raspberry Pi comes with an SD card. Just pop the card into your Mac or PC and format it using the FAT32 format. (On a Mac, you can use the built-in Disk Utility tool to accomplish this step. PC users can install SD Foundation’s free SD Card Formatter utility.)
- Transfer Kodi onto the card. Download the Kodi-based operating system known as OpenELEC to your computer. Then, use some type of imaging tool to write OpenELEC to your Raspberry Pi card. (If you’re on a Mac, use ApplePi Baker. PC users can use the Win32 DiskImager tool.)
- Plug Raspberry Pi into your Samsung Smart TV. Flip on your Raspberry Pi and your Samsung Smart TV. Then, use the input button on your remote to switch to Kodi.
Nvidia Shield
My second favorite Kodi box is Nvidia Shield. Nvidia Shield is powerful enough to be used to play games. Another thing to like about Nvidia Shield is that it runs Android and has Google Play. Because Kodi is on Google Play, installing Kodi on Nvidia Shield is a cake walk.
Samsung Smart TVs have lots of HDMI ports
Like most Smart TVs, Samsung Smart TVs come equipped with multiple HDMI ports - so why not make use of all of them?
Multiple Kodi Raspberry Pi boxes could come in handy if you like using Kodi builds. Kodi builds are outfitted with all kinds of unique artwork and add-ons. Some are designed for sports fans, but others are made to appeal to movie geeks and power users.
If you install multiple Kodi boxes, just use the source button on your Samsung remote when you're ready to switch to a different Raspberry Pi.
Using your phone and Screen Mirroring to play Kodi
Samsung Smart TVs have a feature called Screen Mirroring that allows you to mirror your phone or tablet's display on your TV screen. To activate Screen Mirroring, press the source button on your Samsung remote and select screen mirroring. Then, tell your device to look for your Samsung Smart TV.
- Android: Some Android phones have a built in screen sharing feature called Miracast. On some Android devices, Miracast is called Cast Screen.
- Windows. Some Windows devices have Miracast too, but sometimes the same feature is called Wi-Di.
- Linux. Linux has a Screen Share compatible feature called OpenWFD.
- iOS. Unfortunately, iOS devices only have built-in support for Apple TV.
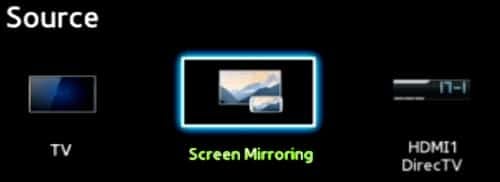
Pick screen mirroring as your source to cast your device's screen to your Samsung Smart TV's display. Source: Samsung
- Note: On most Android phones, turning on Miracast will allow you to connect to your smart TV via Screen Mirroring. On Windows devices, you can connect via Wi-Di. Also, Linux has a Screen Mirroring compatible feature called OpenWFD.
One thing you'll probably find out yourself if you try Screen Mirroring, is that the quality of audio and video you get isn't that great. If your video skips and stutters, you may want to consider trying out Raspberry Pi, Nvidia Shield or some other type of streaming box.
Plex is available in Smart Hub store
Samsung likely opted to exclude Kodi from its Smart Hub store because it's too controversial. However, Smart Hub does host Plex.
If you like the look and feel of Kodi, you'll probably like Plex. Kodi and Plex are similar in many ways because they are derived from the same source code. However, the purpose of Plex and Kodi are different.
Kodi's appeal is that can be expanded in a variety of ways through the use of add-ons. Plex isn't as flexible, but it has some very powerful features that Kodi lacks.
The best thing about Plex is that it allows you to quickly and easily set up your own personal media cloud that you can access and stream across all your portable devices. You can use Plex for free, but you have to pay a fee to unlock its premium features. Subscribing could be a good investment though - especially if you have lots of media files and already own a Samsung Smart TV.
How to run Kodi on Android Smart TVs
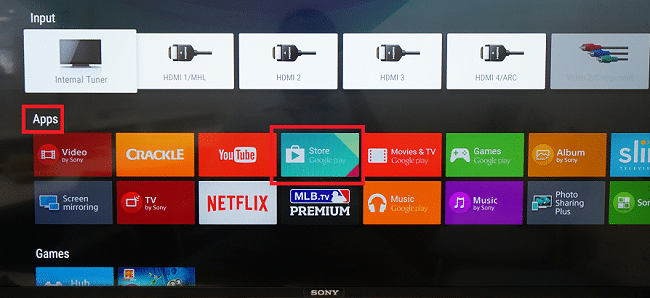
Android Smart TVs are awesome because they are flexible. You can get any Android app you want with just the touch of a button - including Kodi.
All you have to do is hit the home key on your remote, scroll down to the apps shelf and open Google Play. Then, look up Kodi and select install.
It only takes a few seconds to install the Kodi app once you turn on your Android TV. Source: Sony
The Top 3 Android TVs
Sony, Sharp and Phillips have partnered with Google to release Android-powered smart TVs.
- Sony Bravia
- Sharp Aquous
- Phillips Android TV 9000
What is SPMC?
If you own an Android-powered TV set, you may want to go with SPMC instead of Kodi. SPMC is the brainchild of Koying - the Kodi developer that created the original Kodi Android app.
After seeing the success of Nvidia Shield, Koying began to believe that Android holds the future of Kodi. In 2016, he decided to break away from the official Kodi team and start his own Android-centric project.
Because Koying built SPMC specifically for Android, it may actually work better than the official Kodi app. SPMC is free and it's has all the core features of Kodi, so why not download from Google Play and decide for yourself if it works better than Kodi? You might like SPMC if...
You have Nvidia Shield
If you have Nvidia Shield, SPMC is a no-brainer. As mentioned above, SPMC creator Koyling prefers Nvidia Shield and uses it to test SPMC. If you own a Nvidia Shield, you'll likely be able to get better performance and features by switching from Kodi to SPMC.
You have an Android tablet
SPMC is not exactly mobile friendly. However, SPMC's interface wouldn't be as annoying on larger screens. SPMC is pared down and streamlined compared to the Kodi app, plus you can use voice recognition instead of the keyboard to enter text.
You'd rather talk instead of type
SPMC's built-in voice recognition feature is awesome. Instead using SPMC's tiny keyboard to enter in words, you can just punch the "IP" key and speak into your phone instead. SPMC uses Google's voice recognition algorithm to understand what you're saying, then SPMC grabs the text and enters it into the text box. This feature worked flawlessly when I tried it out on my cheapo Android phone, so it should work well on pretty much any device.
You don't like your launcher
If you don't like your current Android launcher, you can opt to use SPMC instead. In launcher mode, SPMC will pop up every time you hit the home button and your apps will appear inside SPMC. Download the launcher version of SPMC from the SPMC website and open it up on your Android device to try it out.
You're an audio geek
If you have a surround sound stereo system, you should definitely use SPMC instead of Kodi. SPMC has a built-in pass-through audio feature. Pass-through audio is a feature that allows you to reduce the amount of cords needed to set up your surround sound system. This guide from Koying explains how to configure pass-through audio on SPMC.
Kodi vs. SPMC
Both have weird interfaces
I initially expected SPMC to be very mobile friendly. But actually, SPMC is still pretty hard to use on a phone. SPMC's default theme is a little easier to deal with compared to Kodi's, but is still unwieldy.
SPMC's main menu screen is a bit of an improvement over Kodi's, though. Instead of a slew of different menus to wheel through, there's only four.
SPMC's main menu. Source: Flixed.io
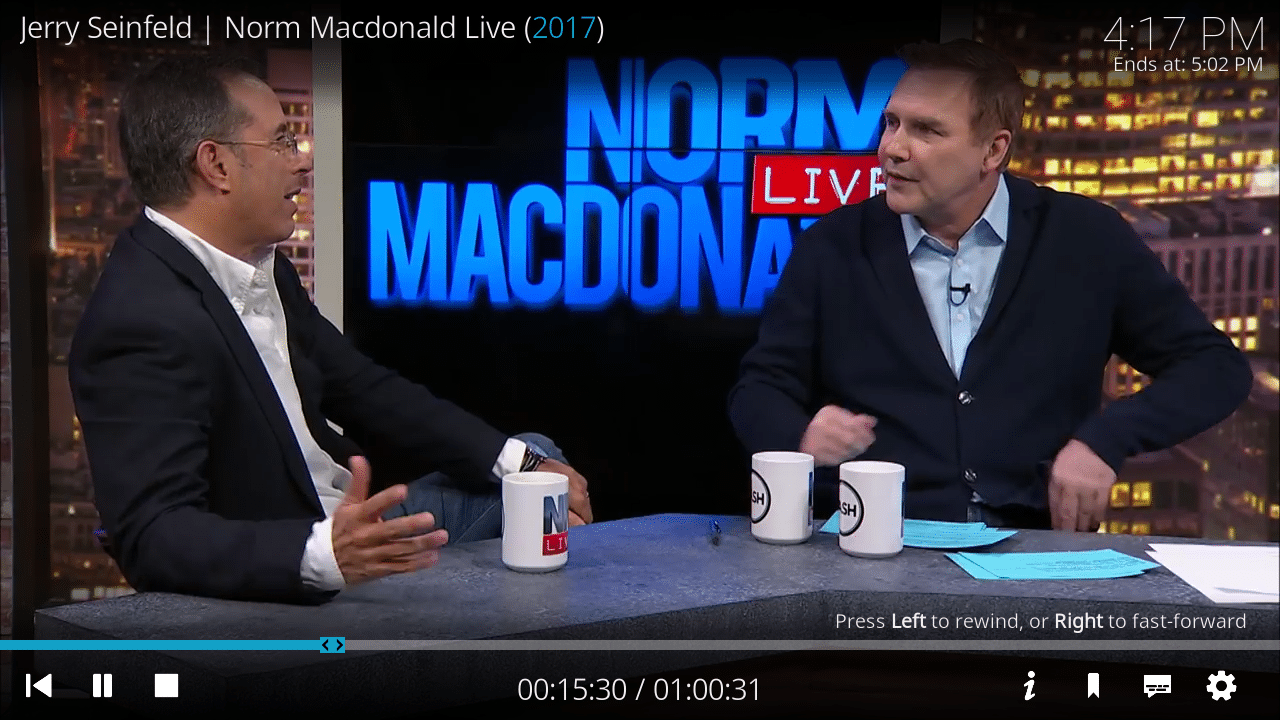
The Kodi app looks exactly the same as the desktop version. Source: Flixed.io
SPMC's deeper menus, though, contain a lot of small text. You have to squint and click around a lot to accomplish even the simplest tasks. You have to do a lot of work just to get to your add-ons, for example. I expected that SPMC would highlight add-ons in the interface, but you actually have to dig to find them.
The official Kodi app is also unnecessarily complex and full of hard-to-read text menus, but I actually like Kodi's method of displaying add-ons better than SPMC's.
SPMC's voice recognition feature is cool
As mentioned above, for whatever reason YouTube doesn't work so great on my phone. After trying out the YouTube add-on on both SPMC and the mobile version of Kodi, I didn't notice any major differences - until I discovered SPMC's built-in voice recognition feature.
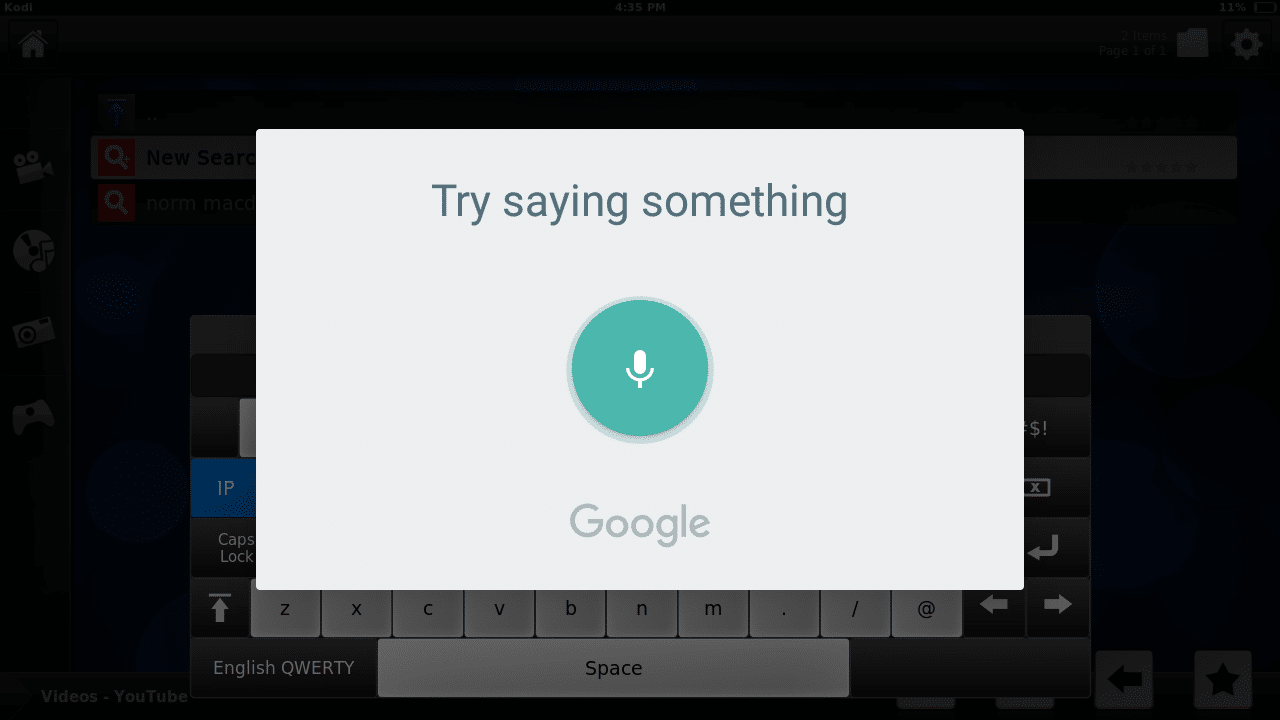
When you click the "IP" button on the on-screen keyboard, you can speak into SPMC. Source: Flixed.io
The IP button on SPMC's keyboard triggers Google. After you're finished talking to Google, SPMC plunks down Google's interpretation of what you said into any text box. This feature is nice because it allows you to search for YouTube videos without having to peck at SPMC's ridiculous miniature on-screen keyboard.
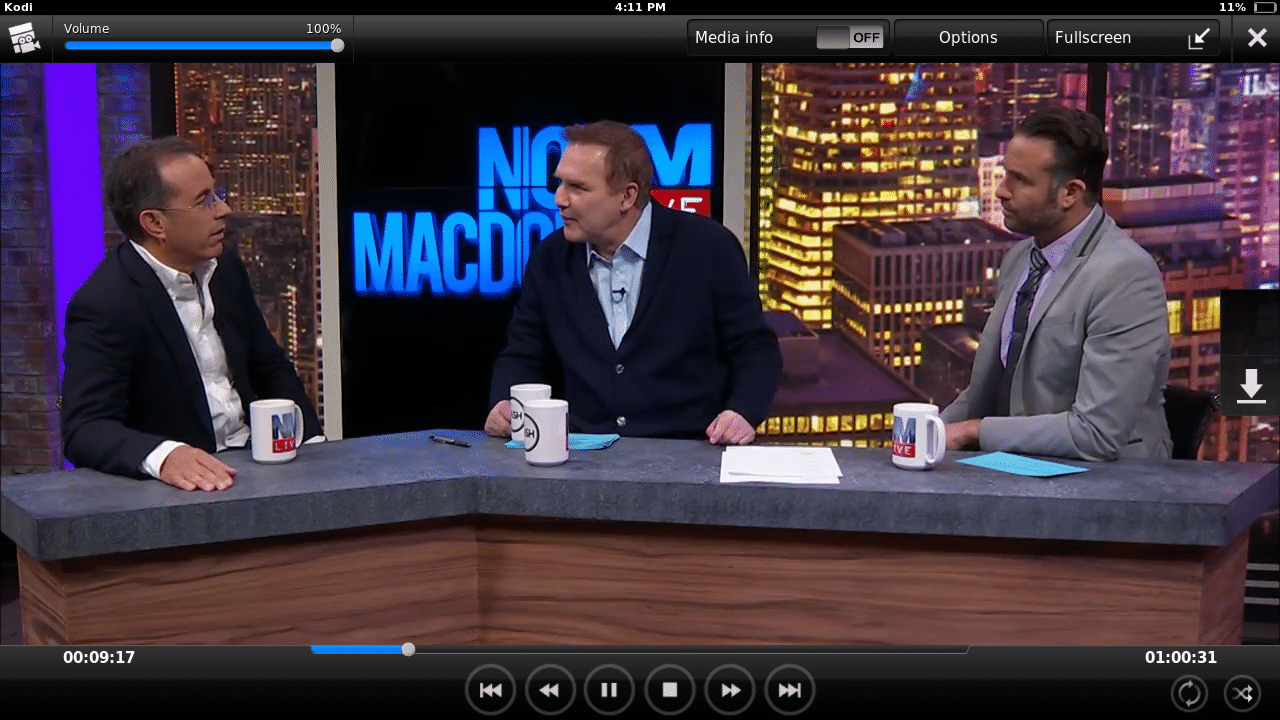
YouTube video performance is about the same
The YouTube video I watched looked pretty good on both the Kodi app and on SPMC. However, I did notice that SPMC seemed to be slightly less laggy when skipping around inside the video's timeline.
SPMC is a bit more responsive compared to the Kodi app when skipping around inside a YouTube video. Source: Flixed.io
High resolution YouTube videos still look pretty good on the Kodi app. Source: Flixed.io
Both are very average for music
Both the Kodi app and SPMC are sorely lacking when it comes to basic music player features. All they can do is play music files - and that's about it.
I was hoping SPMC would have a built-in EQ, but it does not. It can't download lyrics or album art, either. It does, however, have a slightly better interface - and a somewhat useless music visualizer features.
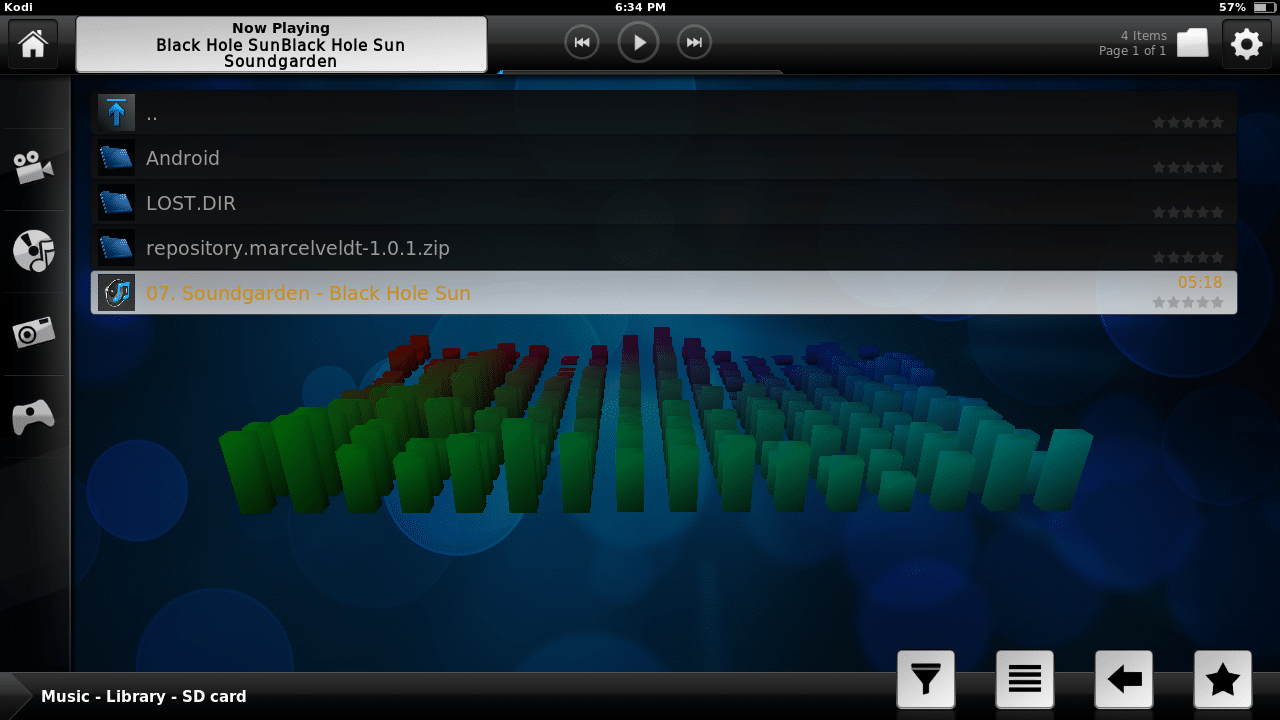
The main music feature SPMC has that Kodi lacks is a visualizer. Source: Flixed.io
You have to pull up the side menu in the Kodi app if you want to stop the music or skip to the next song. Source: Flixed.io
I didn't notice any differences in audio quality when I tried playing some music files via the Kodi app and SPMC.
After trying out both Kodi and SPMC on my Android phone, I don't think that I will continue to use either of them on a regular basis. If I ever need to pull up a YouTube video on my phone, though, I plan on using SPMC instead of my YouTube app.
How to setup an OTA Antenna with Kodi
Here’s a quick overview of how to setup an OTA Antenna wiht Kodi.
Prerequisites
Before you continue, you’ll need to download and install the free, open source media player known as Kodi. Kodi is available on Mac, Windows, Android and many other platforms. You'll also need an HDHomeRun device that works with OTA antennas.
- Internet connection
- A Kodi compatible operating system
- The Kodi software (download link)
- HDHomeRun Connect or HDHomeRun Extend
- An OTA antenna
The basics: How OTA works on Kodi
A Kodi-powered OTA system consists of two main components: an OTA signal grabber/converter (the back-end) and the Kodi player itself (the front-end). Some type of OTA antenna add-on is also required for OTA integration to work on Kodi, since the basic version of the Kodi player lacks native OTA antenna functionality. And of course, you'll need an OTA antenna as well.
Why we recommend HDHomeRun
We think HDHomeRun is the best way to intefrate OTA antenna feeds with Kodi because it shrinks the entire OTA antenna integration process down to a few simple steps.
Note that HDHomeRun is not an OTA antenna itself_. Rather, it connects with an antenna to pull all_ the live TV feeds into a neat interface that can be accessed via a Kodi add-on, which we will discuss below.
HDHomeRun reduces the amount of hardware you have to install and configure down to a single plug-and-play device. Another reason to like HDHomeRun is the excellent official HDHomeRun Kodi add-on, which the company maintains and updates on a regular basis. A new alternative to HDHomeRun called Tablo has some interesting features, but it's not as reliable and is also significantly more expensive.
Relevant terms & lingo
Before we go any deeper, here are a few common technical terms that you'll run into on this and other cord-cutting related guides.
Front-end
The front-end is the interface you use when watching OTA broadcasts. The front-end of your OTA signal snatching system will be Kodi, but other similar players like Plex can also receive OTA feeds. The front-end can't grab the OTA signal all by itself, but it can play the signal once it's properly formatted.
Back-end
The back-end is the part of the OTA system that captures the TV signal and converts it into a format that Kodi can understand. You can either use a device like HDHomeRun as a back-end or you can download a software back-end and use that instead. Software back-ends tend to hog memory, which is why we think it's a better idea to use a dedicated back-end device.
PVR
PVR stands for Personal Video Recorder. A PVR system could just be a software application that saves video to your hard drive. Or, it could be a separate piece of hardware (like TiVo, for example).
EPG
EPG stands for Electronic Program Guide. EPGs have menus that allow you find out what's on and choose what you want to watch.
NAS
NAS stands for Network Attached Storage. Basically, this is just a stand-alone hard drive that can connect to your home network. If you use a NAS instead of your computer to download TV shows via your OTA antenna compatible Kodi system, you won't have to worry about your computer's hard drive filling up.
Picking out your OTA Antenna
Amazon Basics and Mohu are two of the most popular brands for OTA antennas. Both brands have similar prices and specs. However, Mohu's antennas come in several different models and generally look more stylish. Also, Mohu's antenna with the longest range extends a bit farther than Amazon's.
Amazon Basics
Four different types of Amazon Basics OTA antennas are available (25 mile, 35 mile, 50 mile and 60 mile) and they are all capable of pulling in 1080p HD quality signals.
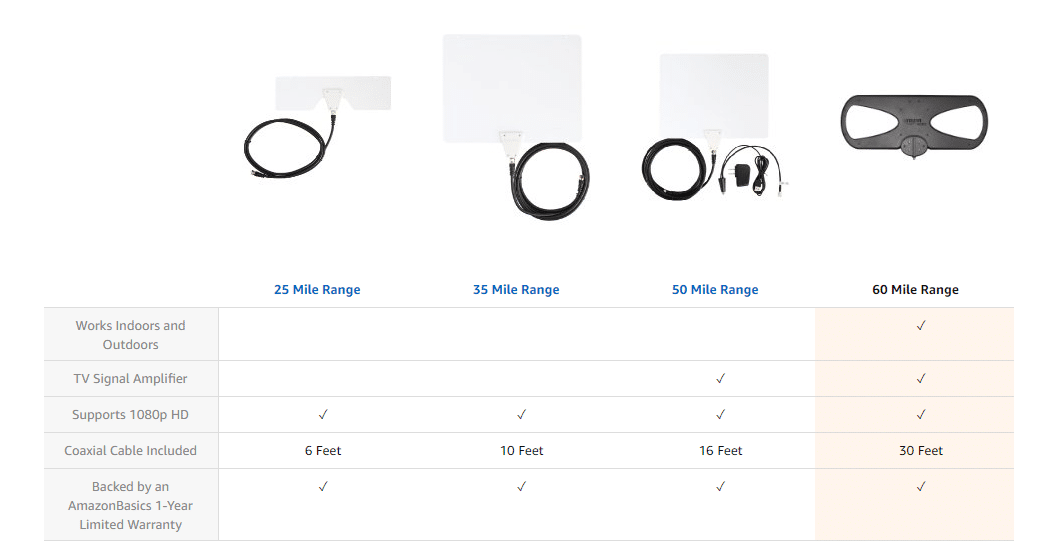
Source: Amazon
The 60 mile model is interesting because you can mount it outside. It could be a good choice if you live in the middle of nowhere, but it may not be ideal if you live near a metropolitan area due to the fact that interference could become an issue.
Mohu
There are three main types of Mohu antennas: Leaf, Sky and Curve. Leaf antennas are extra thin and can be mounted on windows. Long range Sky Mohu antennas are designed to be mounted outside and can pull in feeds from 65 miles away. The Curve line of antennas are for people who live closer to cities and are designed to be mounted on shelves and desks.
The simplest way to set up an OTA Antenna on Kodi
There are several ways to setup an OTA antenna in Kodi, but HDHomeRun provides a quick, cheap and reliable option. More complicated installation methods require you to do things like install a Linux server or open up your computer and install a TV tuner card. HDHomeRun, however, provides a complete plug-and-play solution for porting OTA channels to Kodi via your antenna.
Step 1: Plug in HDHomeRun
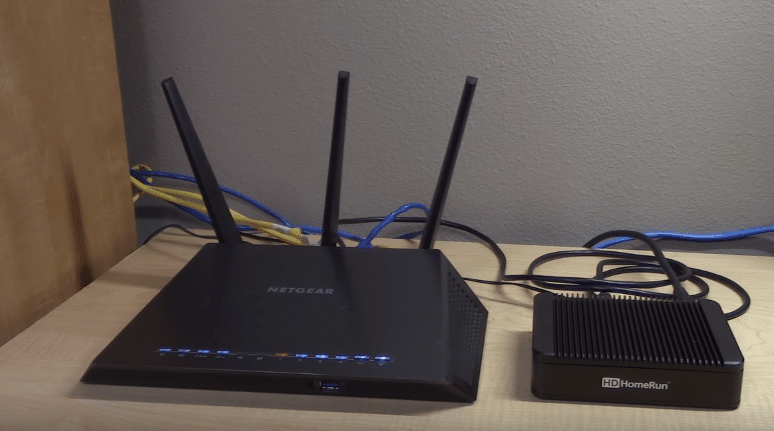
Setting up HDHomeRun is a simple matter of plugging in 3 different cords. Source: YouTube
Setting up HD Home Run is simple. First, plug in the power cord. Then, connect HD Home Run to your wireless router using a standard Cat 5 Ethernet cable. Finally, connect HD Home Run to your OTA antenna via coaxial cable.
Step 2: Open the HDHomeRun website
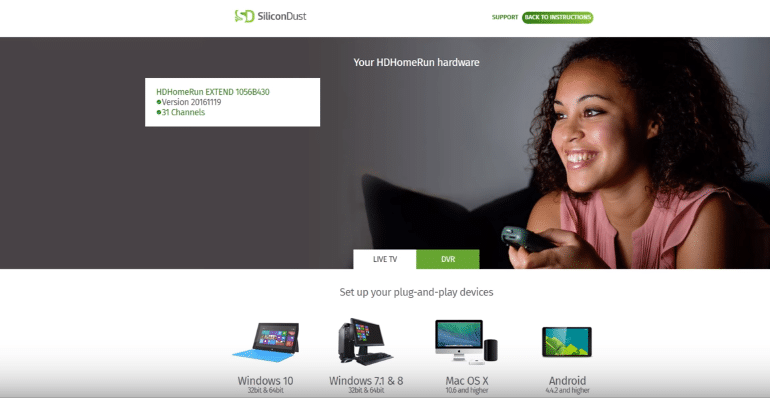
The HDHomeRun configuration website. Source: YouTube
After you connect HDHomeRun, it will give you a link to the HD Home Run website. On the top left part of the screen you will see a box that indicates the number of channels that your HD Home Run device has discovered.
- Optional: Click the green tab labeled DVR to set up a PVR (Personal Video Recorder) system in the cloud. DVR service through HDHomeRun costs $35 a year.
Step 3: Install the HDHomeRun Kodi add-on
Follow the steps listed below to install the HDHomeRun add-on for Kodi.
- Open Kodi
- Click Add-ons from the menu on the left
- Click the box icon
- Choose Install from repository
- Click Video add-ons
- Scroll down until you see HDHomeRun
- Click HDHomeRun and choose Install
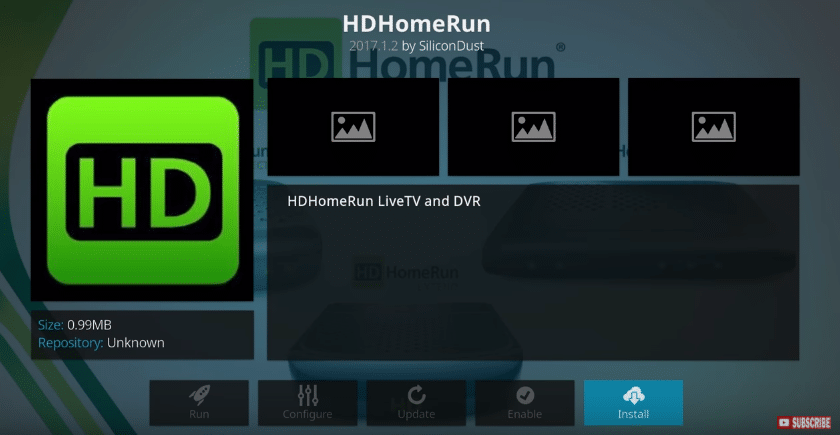
HDHomeRun is hosted in the official Kodi repository, so you don't need to get any additional repositories to install it. Source: YouTube
Step 4: Open the HDHomeRun add-on and enjoy
Once you open HDHomeRun, you'll be able to flip to whatever channel you want to watch. The add-on will be able to detect the live TV stream that is now being transmitted by the HDHomeRun box.
If you press the escape button on your keyboard or the back button on your remote, you'll encounter this screen:
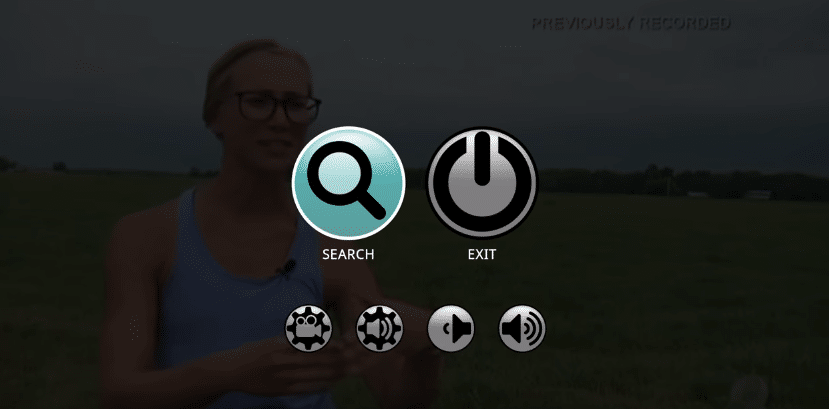
Hit the escape key or the back button on your keyboard to search for channels and adjust your video and audio settings. Source: YouTube
The video camera icon on the far left is for configuring your video playback. The two small buttons on the right allow you to turn the volume up and down. The second button from the left allows you to fine tune your audio settings.
The optional HDHomeRun annual subscription
The HDHomeRun system works perfectly well without DVR, and is a good solution for streaming live TV. But if you want the ability to save shows for later on your hard drive, you may want to consider HDHomeRun's DVR service. For only $35 a year, it's actually not a bad deal.
With a subscription to HDHomeRun DVR, you can:
- Get a better EPG (Electronic Program Guide). The free version of the EPG allows you to zoom ahead 24 hours, but with the paid version you can see what's ahead up to 14 days in the future.
- Save for later. You have to upgrade to gain the ability to save content to your hard drive or NAS.
- Zoom past commercials. If you buffer your live stream a bit by pausing it for a few minutes, you can zoom forward when a commercial comes on.
- Filter by category. The paid version of HDHomeRun gives you the ability to look up content by genre.
- Record entire series. Other DVR solutions require you to select one episode at a time, but with a touch of a button you can tell HDHomeRun to record every episode of your favorite show.
- Hop across different devices. If you have an Android phone, you can start watching something on it and resume where you left off when you log into Kodi.
- Record your favorite team's games. One of the coolest features in paid mode is the ability to have HDHomeRun automatically track your favorite team.
HDHomeRun model comparison
All 3 HDHomeRun models are super easy to set up, but each one has a different set of features that you should know about before you commit.
In a nutshell
If you're priority is OTA antenna integration, be sure to check which kind of wireless router you have before you buy.
If you have a new wireless router
If you have a new 802.11ac type wireless router, then you don't need as much power and you can save some money by going with HDHomeRun Connect.
If you have an old wireless router
If you own a 802.11n, you should get the slightly more expensive HDHomeRun Extend so that you can get HD quality channel feeds. HDHomeRun Connect will still work, but you'll be stuck with SD quality channels.
Note: HDHomeRun Prime is only for people who have cable and want to pipe cable TV channels to Kodi and other front-end video systems. It doesn't work with OTA antennas.
HDHomeRun Connect
As mentioned above, the main benefit of HDHomeRun Connect is that is a bit cheaper compared to HDHomeRun Extend. However, it's also not quite as powerful. You need a new 802.11ac wireless router if you want to get HD via this device.
Connect currently has a 4 out of 5 star rating on Amazon. That's an impressive stat, considering that over 1,600 people have reviewed it. Right now Connect is the #1 best selling item in the External TV Tuners category.
Features
- Simultaneous OTA antenna playback on 2 devices
- Saves videos to your computer
- HD quality (802.11ac routers only)
- Compatible with most devices (DNLA support)
Pros
- Cheaper than HDHomeRun Extend
- Transfers HD quality streams over 802.11ac
- Super easy to set up
- Reliable performance
Cons
- People with older 802.11n wireless routers have to settle for SD streams
- No iOS app
HDHomeRun Extend
HDHomeRun Extend has extra horsepower that allows it to broadcast HD quality signals across older 802.11n wireless routers. It's nearly twice as expensive as HDHomeRun Connect, but could be worth buying if you have a 802.11n router and intend to stick with it.
Like Connect, Extend has plenty of reviews (over 1,600) and an excellent 4 out of 5 rating on Amazon.
Features
- Simultaneous OTA antenna playback on 2 devices
- Saves videos to your computer
- HD quality (works with both 802.11ac and 802.11n routers)
- Compatible with most devices (DNLA support)
Pros
- Pushes HD signals over both older 802.11n routers and new 802.11ac routers
- Easy to use
- Reliable performance
Cons
- More expensive than both Connect and Prime
- No iOS app
HDHomeRun Prime
If you don't have cable, don't get HDHomeRun Prime. It doesn't have OTA antenna functionality, so there's no way to hook it up to an antenna.
Surprisingly, HDHomeRun Extend actually costs a bit more than HDHomeRun prime. It's likely cheaper because like HDHomeRun Connect, it lacks the ability to send HD signals over older 802.11n routers.
Features
- Simultaneous cable TV playback on 3 devices
- Saves videos to your computer
- HD quality (works with both 802.11ac only)
- Compatible with most devices (DNLA support)
Like Connect and Extend, HDHomeRun Prime is doing quite well on Amazon. It has over 1,600 reviews and a 4 out of 5 star rating.
Pros
- Streams cable to your digital devices
- Reasonable price tag
- Simple setup
- Supports more devices that Connect and Extend
- Reliable performance
Cons
- No OTA antenna support
- No iOS app
A new HDHomeRun alternative: Tablo
HDHomeRun's main competitor is Tablo. Among cable-cutters, Tablo has a bit of a bad reputation for buggy live OTA performance. However, its devices do have tempting looking feature lists.
Like HDHomeRun, Tablo devices offer easy plug-and-play installation. Another similarity is that Tablo also has a branded add-on that allows you to stream video straight into Kodi.
Tablo makes four devices for streaming OTA broadcasts:
- Tablo 2-Tuner
- Tablo 4-tuner
- Tablo DUAL
- Tablo Engine adapter
The new Tablo Engine adapter stick looks particularly awesome and can plug right into nVidia SHIELD. Tablo Engine isn't available via Amazon yet, though. To get a Tablo Engine adapter, you have to order it directly from the Tablo store.
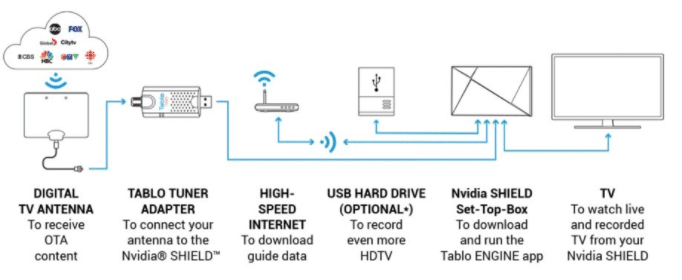
Source: Tablo
Another brand new product from Tablo is Tablo DUAL. The most interesting thing about DUAL is its built-in 64 GB NAS hard drive. DUAL is pricey compared to the competition, though-- and it's not available via Amazon yet, either. You have to either order through the Tablo store or pick one up at Best Buy if you want to buy one.
The original version of Tablo allows you to connect up to 4 devices simultaneously-- but some Tablo owners say it's buggy and not very reliable.
How to install LibreELEC with Kodi
If you're looking for an inexpensive, yet fully-functional way to stream digital media, you may want to consider using LibreELEC to create a Home Theater PC (HTPC). LibreELEC is a minimal, Linux-based operating system that’s built specifically for use with the Raspberry Pi and other “single-board” HTPC systems.
What is LibreELEC?
LibreELEC (short for “Libre Embedded Linux Entertainment Center”) is a fork of the popular “OpenELEC” open-source operating system. LibreELEC was first started in late 2016, when creative differences among OpenELEC developers caused them to split into two separate entities.
Just like OpenELEC, LibreELEC is a lightweight Linux-based OS that’s built around the Kodi media player. It comes with Kodi pre-installed and is built to run Kodi smoothly and efficiently.
LibreELEC is optimized to be run on all flash-based hard drives. Examples of flash-based hard drives include USB flash drives, SSDs and SD cards.
With LibreELEC, it’s easier than ever to set up a Kodi installation on your Raspberry Pi or on any other streaming device.
What will I need to install LibreELEC?
Here are the materials you’ll need to install LibreELEC on your streaming device.
- A compatible single-board PC. Options include the Raspberry Pi 1, 2, 3, or 0 and Odroid C2. Android boxes from WeTek (Core, Hub, Play, and Play 2) can also support a LibreELEC installation.
- A Linux, Mac, or Windows-based PC for flash imaging and installation.
- A high-speed SD card (recommended) or a flash drive (optional for Raspberry Pi installs).
- An SD card reader (if using a computer without a built-in SD card reader).
That’s it! Now, let's move on to the installation instructions.
How to install LibreELEC on your streaming device
Here’s a step-by-step breakdown of the installation process.
Step 1. Downloading the LibreELEC USB-SD creator
-
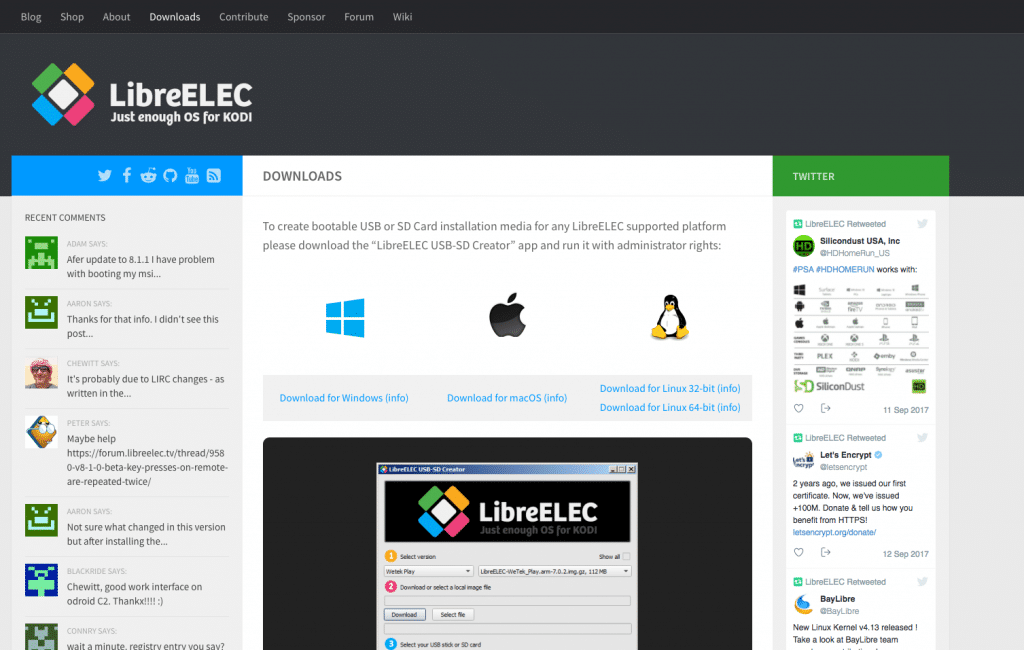
Go to the LibreELEC downloads page and select the appropriate operating system, as seen in the below screenshot.
-
Download the utility and locate it in your Downloads folder. If you’re on a Windows computer, simply double-click the .exe. The filename will be LibreELEC.USB-SD.Creator.Win32, or something similar. For Mac users, the download will be named LibreELEC.USB-SD.Creator.MacOS.DMG. Double-click the .dmg file, and drag it to the Applications folder to install it.
-
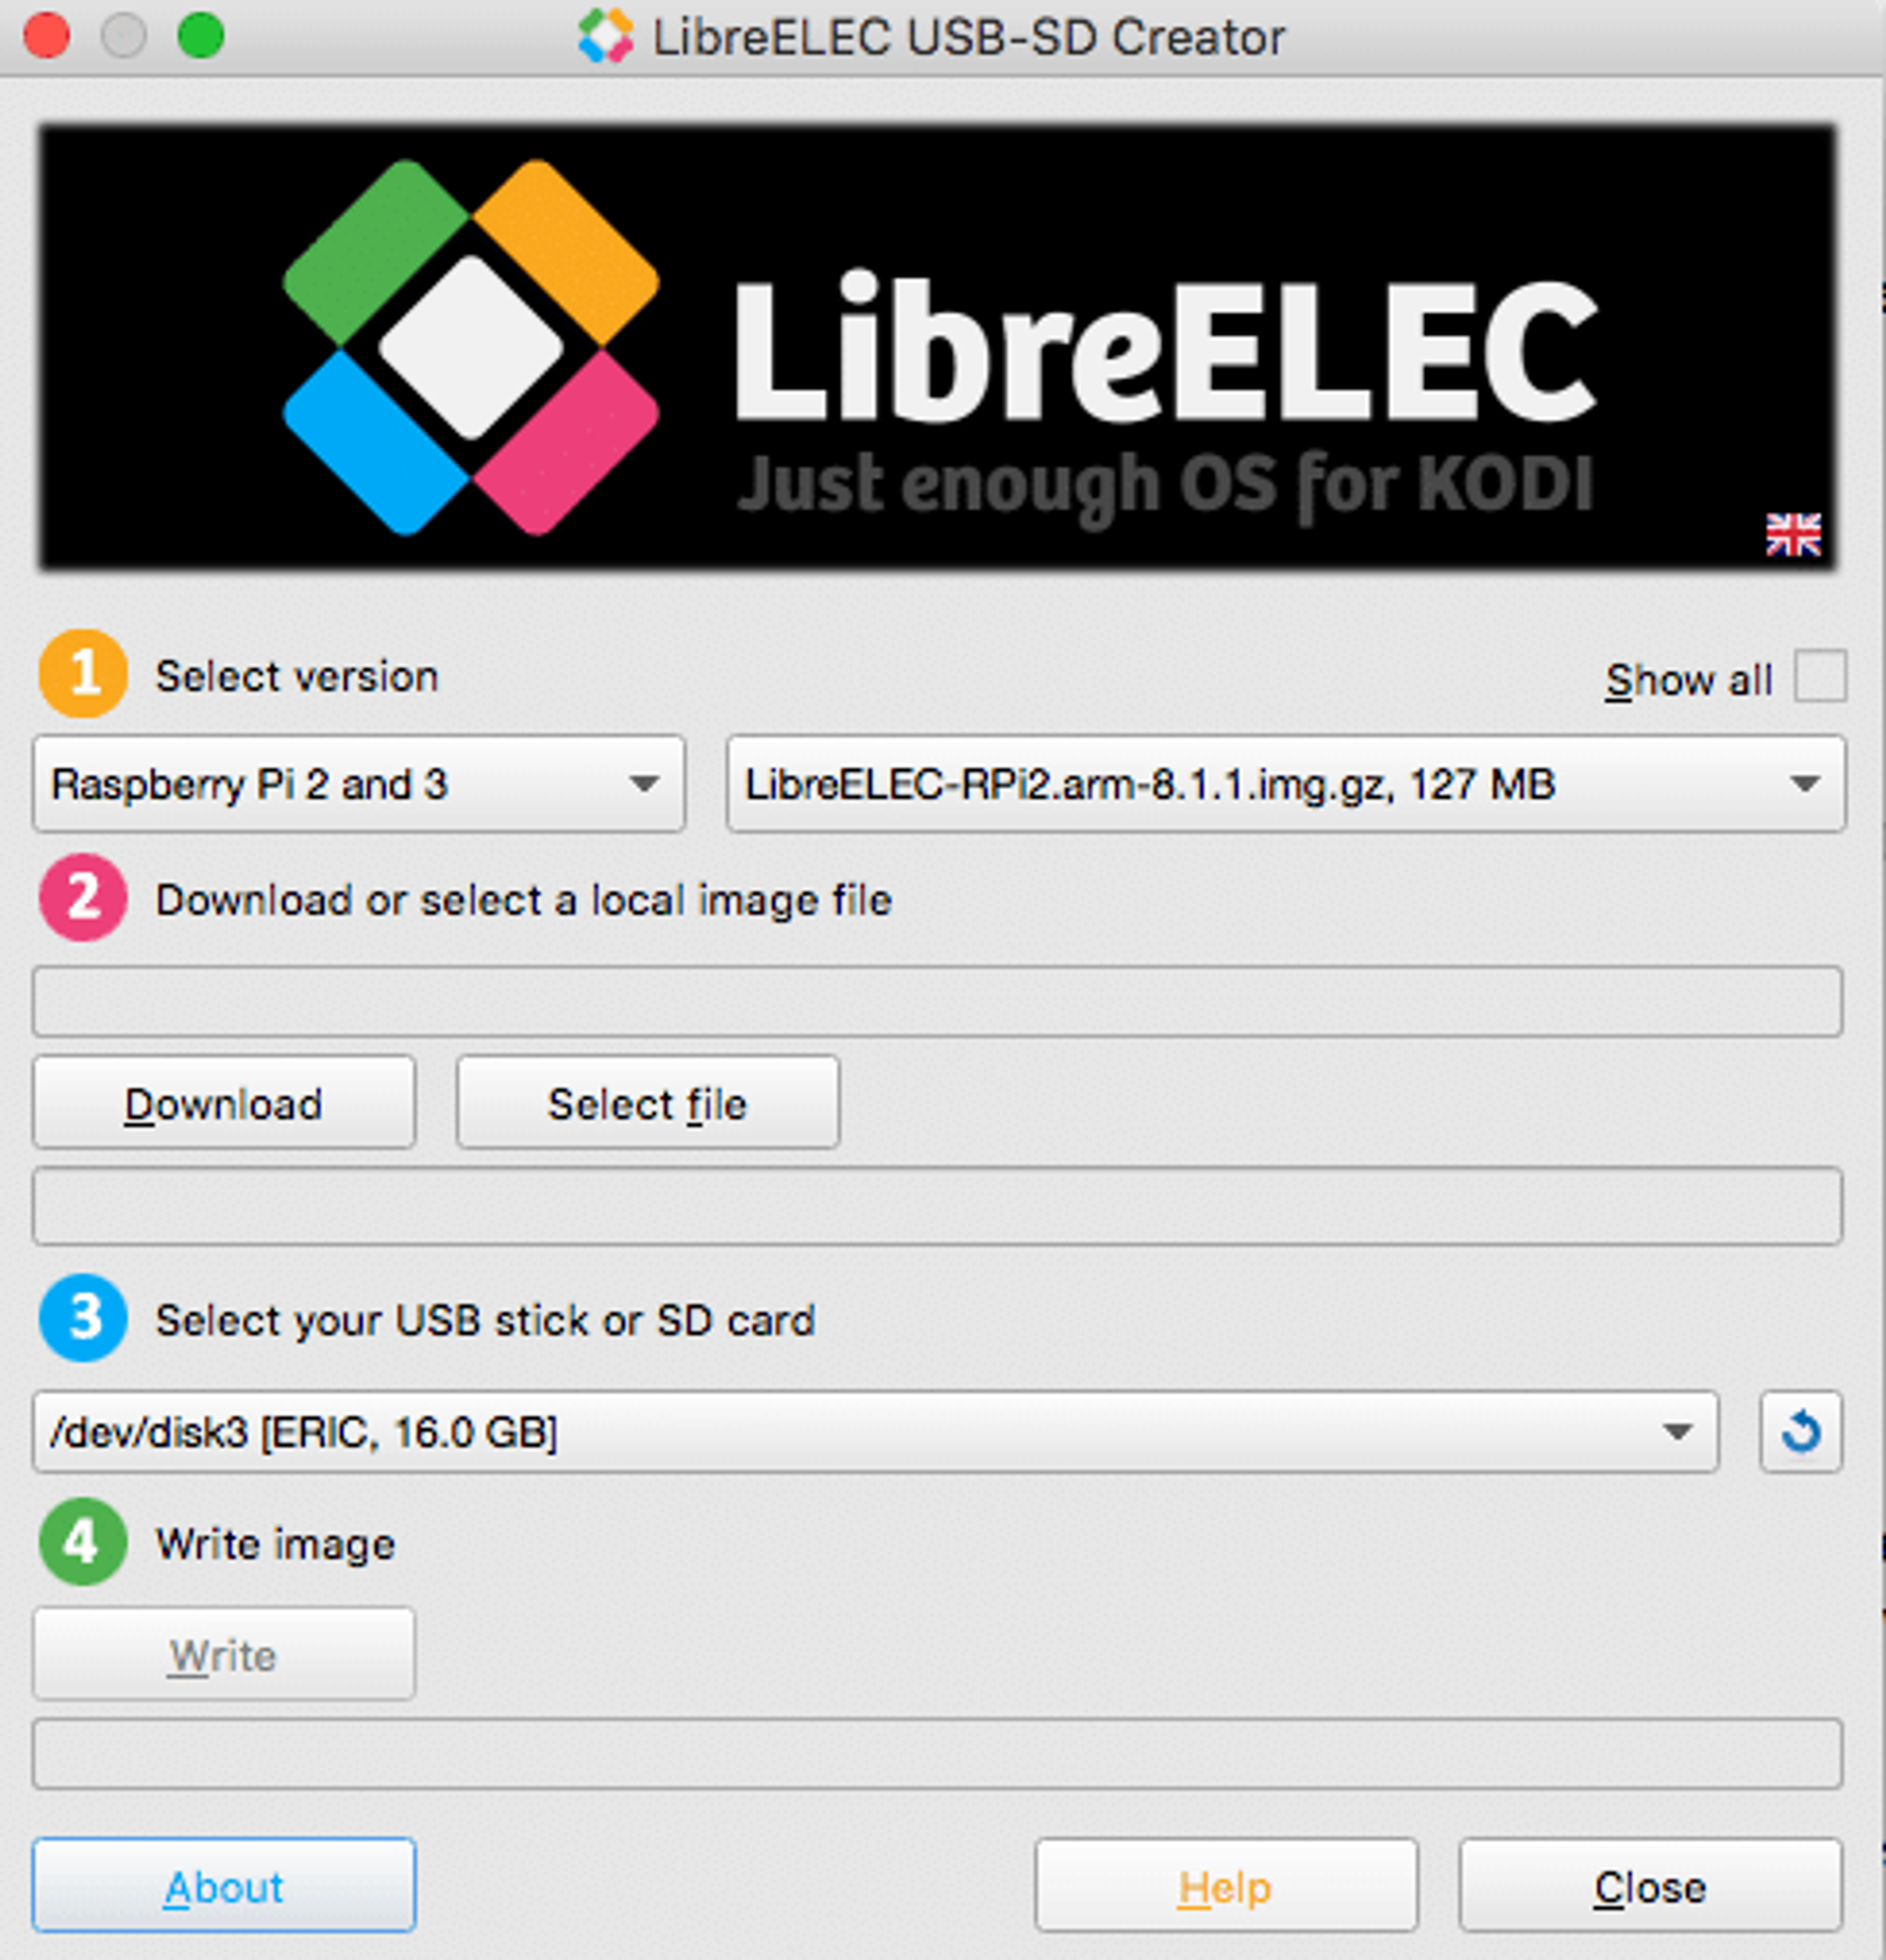
Open the LibreELEC USB-SD creator. You’ll see the interface shown below.
Source: AddonHQ. The main UI of the LibreELEC USB-SD Creator.
Next, let’s discuss how to create the proper LibreELEC image and burn it to your flash media of choice.
Step 2. Creating a LibreELEC image
-
Select the version of LibreELEC you’ll be installing. I'm using a Raspberry Pi 3, so I have selected the option labeled Raspberry Pi 2 and 3. The default download option will be the latest version of the LibreELEC software.
Source: AddonHQ. Select "Download", adjacent to "Select file" to begin downloading the latest LibreELEC image.
-
Select Download. Then, follow the on-screen instructions to select the desired download location for your disk image.
NOTE: If desired, you can download an older version of the LibreELEC software. Simply tick the Show all box, located above the LibreELEC version selector.
- Your disk image file will begin downloading to your preferred location, as shown in the below screenshot.
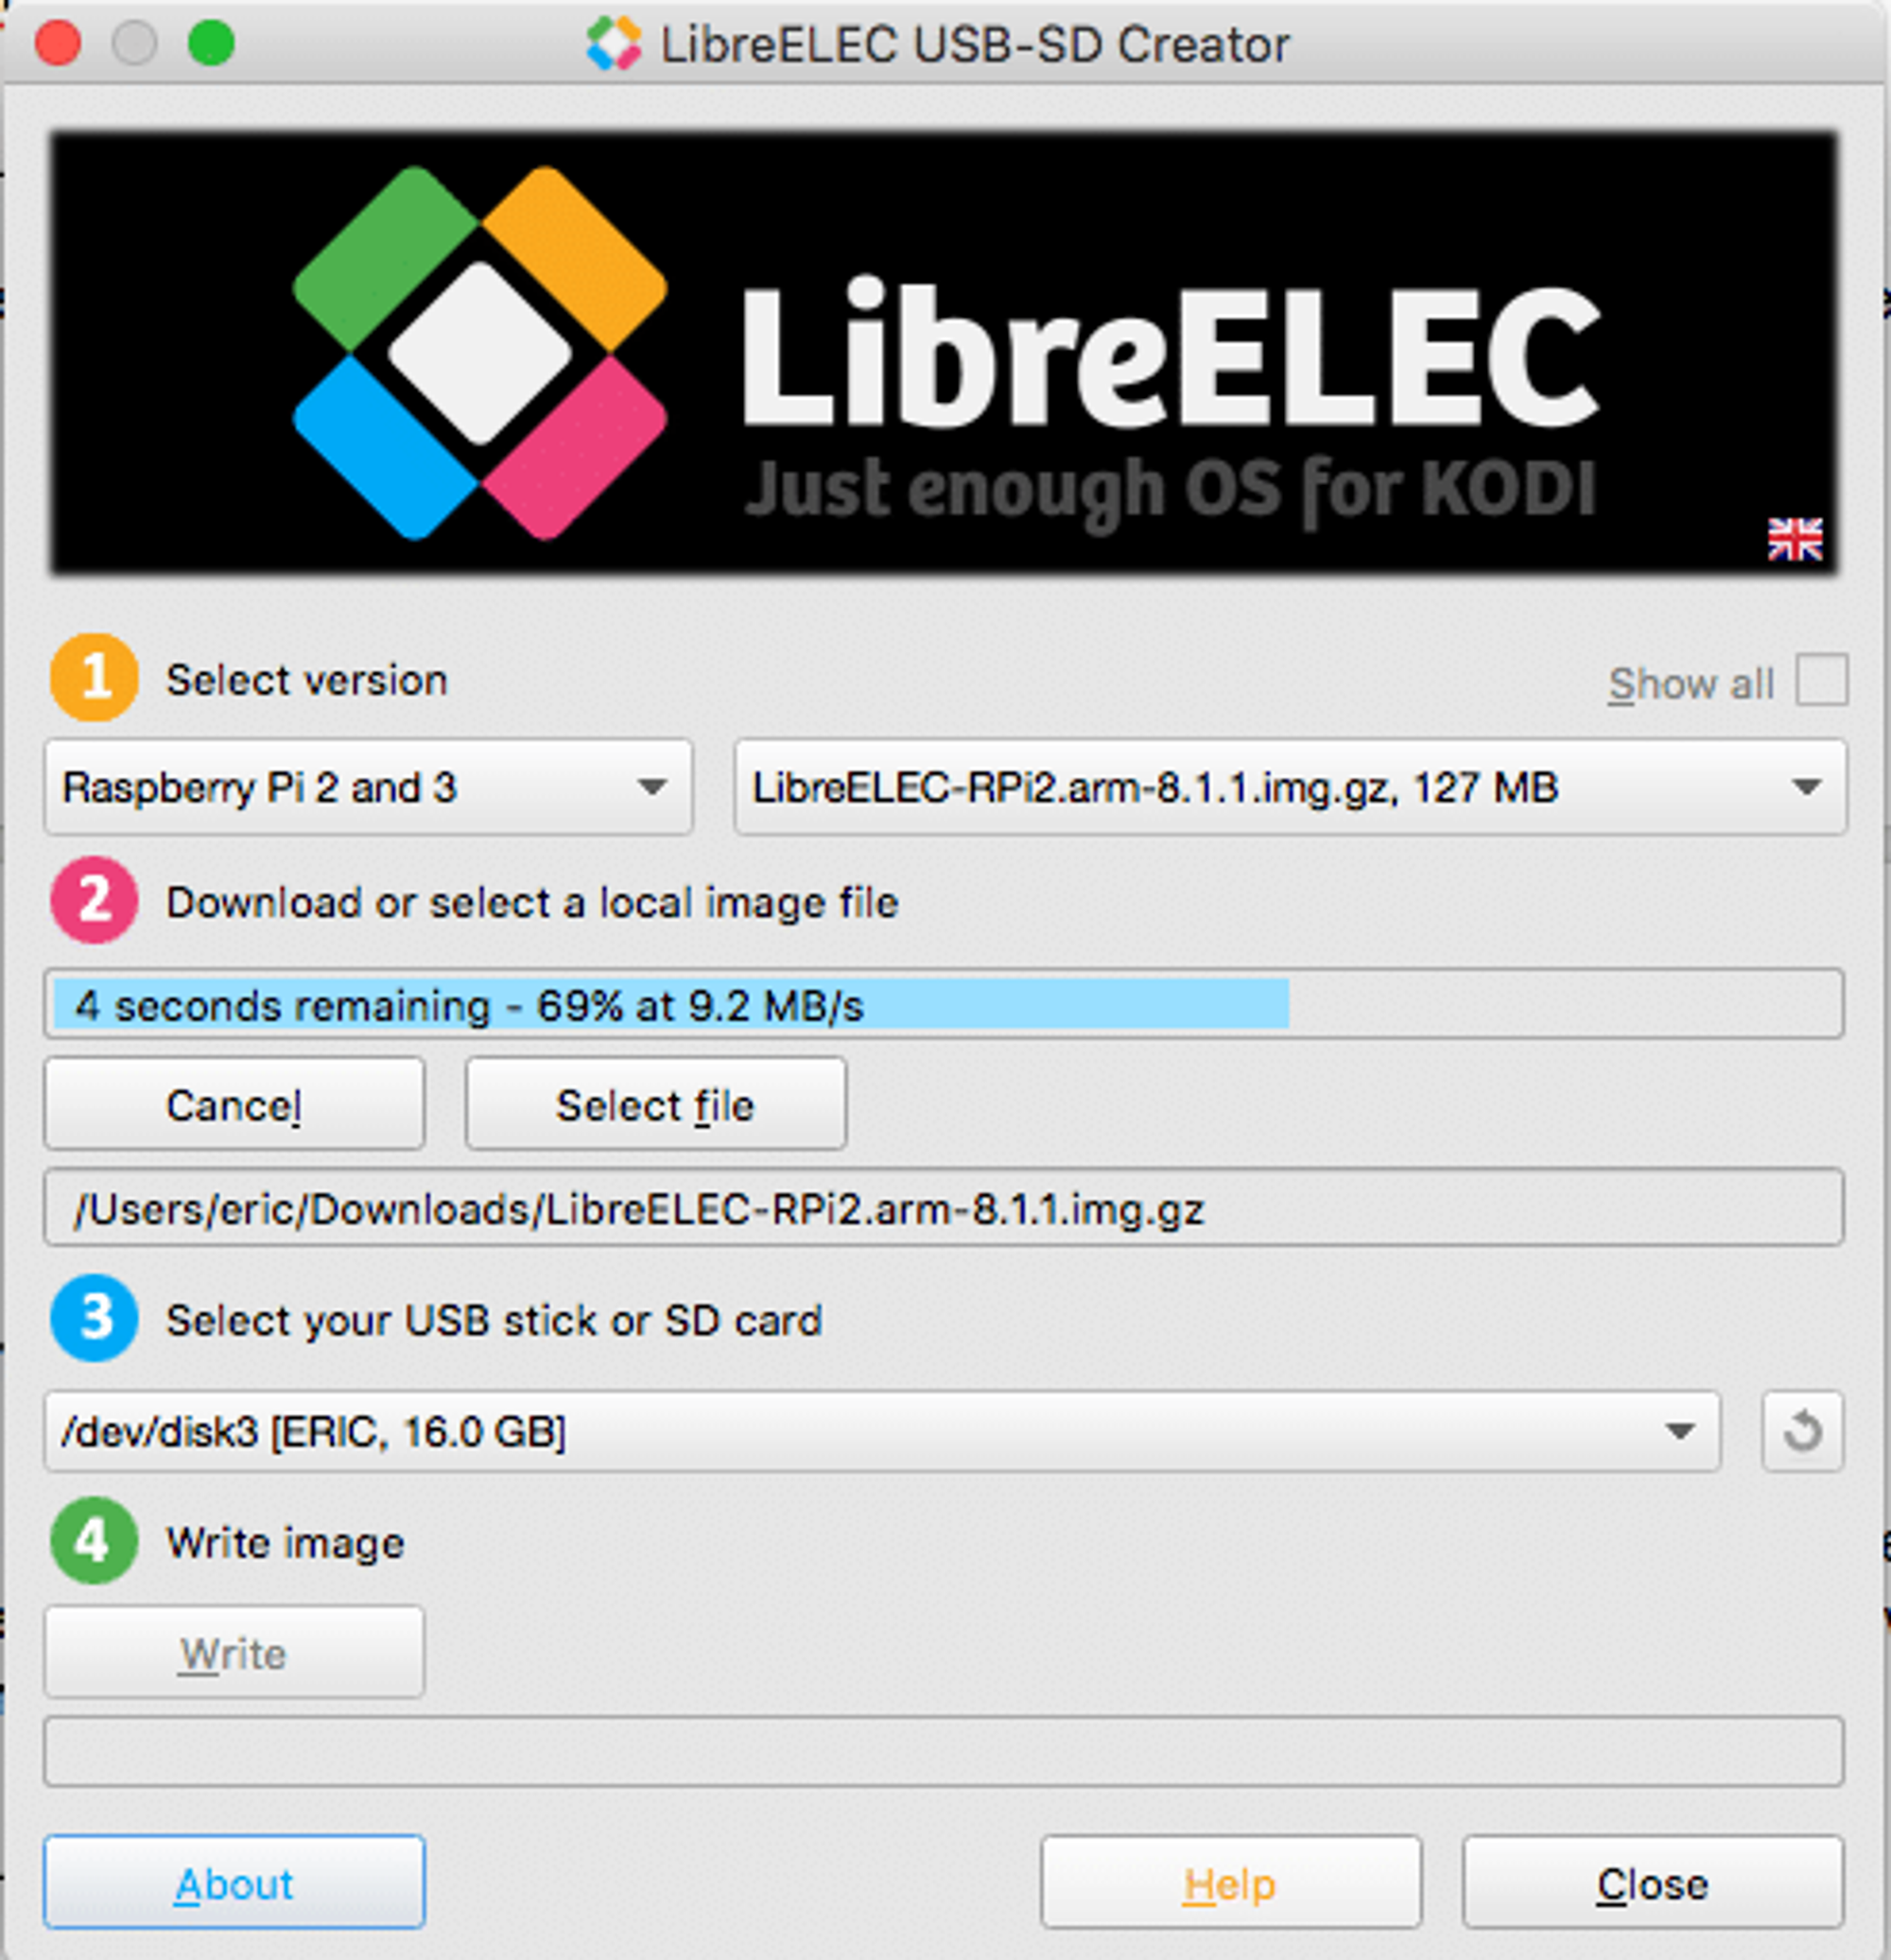
Source: AddonHQ. The download in-progress.
- When the download has completed, the disk image will be automatically selected. If you deselect your disk image by mistake, choose Select file and navigate to the location of your disk image. In my case, this is /Users/eric/Downloads/LibreELEC-RPi-2.arm-8.1.1.img.gz. However, the location of your disk image may differ depending on your operating system and your selected download location.
- Next, select your preferred USB stick or SD card. Each connected flash storage device should show up in the provided drop-down menu. If your device is not shown, press the blue “refresh” button to the left of the menu, as shown below:
Source: AddonHQ. The selected flash media will be available in the drop-down menu here.
I’m using an SD card named ERIC'S SD, which is visible in the drop-down menu. Ensure you have the right drive selected.
NOTE: We recommend using an SD card over a USB drive, if possible. For Odroid and WeTek devices, you’ll have to use an SD card, as these devices do not support USB booting. Raspberry Pi devices are able to use USB drives, but are natively designed to work more effectively with SD cards.
- Select Write to begin the process of writing your disk image. The LibreELEC utility will erase your selected disk drive and install a fully-mountable, functional version of the LibreELEC OS.
NOTE: This will erase ALL DATA PRESENT on your flash drive, SSD or SD Card. We recommend using only a blank piece of flash media, or backing up all required files before writing your disk image.
- The writing process may take several minutes, depending on the speed of your computer and your selected flash device. After it’s complete, eject your flash device from your computer.
Step 3. Installing LibreELEC on your streaming device
Installation steps vary depending on the streaming device.
Installing LibreELEC on Raspberry Pi
Installation for LibreELEC on Raspberry Pi is quite simple. Here’s what you’ll need to do.
- Insert your SD card into your Raspberry Pi.
- Press the power button. Your Raspberry Pi should automatically read the OS and begin installing LibreELEC. Installation and initial booting may take up to 5 minutes.
- Run LibreELEC. Follow the onscreen prompts to complete installation.
That’s it! You now have a fully functional Kodi installation on your Raspberry Pi!
Installing LibreELEC on Odroid C2
Here's everything you need to do to install LibreELEC
- Insert your SD card into the Odroid device.
- Plug in your HDMI/WiFi module before plugging in the power cord.
- Boot up the Odroid C2. The device will start, and show the LibreELEC logo for a few minutes while installation occurs.
- The Odroid C2 will boot into Kodi automatically after installation completes. Follow the on-screen prompts to complete installation.
It’s as easy as that. Enjoy your new Kodi installation!
Installing LibreELEC on WeTek Android boxes
WeTek Android Boxes can dual-boot LibreELEC and the default WeTek operating system. If you have an older WeTek Play device, you may need to run the WeUpdate application to enable dual booting. Here’s how to install LibreELEC on WeTek Android boxes.
- Power off the WeTek device. Insert your bootable SD card into the appropriate slot on your WeTek device.
- Press and hold the “reset” button (located in a toothpick-sized hole on the side panel of the device).
- Power the device on and continue holding the “reset” button for 7-8 seconds. At this point, LibreELEC installation will start.
After LibreELEC has been installed you can boot directly into LibreELEC by pressing the power button on your remote twice. That’s it – you’re good to go!
Step 4. Using LibreELEC and installing Kodi add-ons
While the Kodi installation included with LibreELEC is not exactly the same as the desktop version, it works very similarly.
Here’s a screenshot of the main LibreELEC menu.
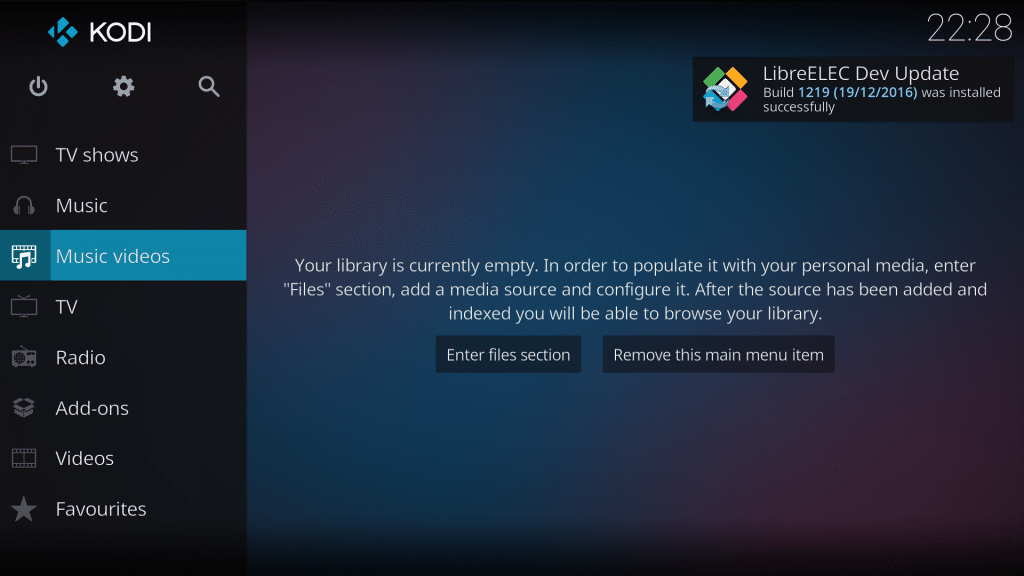
Source: Kodi forums. The main menu of LibreELEC.
You can install third-party add-ons and official Kodi add-ons just like you would on the desktop Kodi application, so your choices are nearly limitless.
Why use LibreELEC? The pros and cons
LibreELEC has many good features but it's not as a flexible as an ordinary operating system.
Pros
- Extremely easy to use – As you can see from our installation and setup guide, it’s incredibly easy to get started using LibreELEC. Unlike some Linux-based distributions, it’s pretty much impossible to install LibreELEC incorrectly. Because minimal configuration and setup are required to get started, just about anyone can use LibreELEC.
- Kodi comes pre-installed – LibreELEC comes with a specialized, updated version of Kodi pre-installed.
- Incredibly fast and lightweight – The LibreELEC OS is as barebones as possible. Essentially every function that’s not necessary for running Kodi has been trimmed away.
Cons
- Can’t (easily) be used for anything but Kodi – The lightweight design of LibreELEC is a bit of a double-edged sword. Because LibreELEC contains nothing but what’s required for running Kodi, it's extremely limited in terms of customization. If you just need a Kodi HTPC and nothing else, you probably won't care. But if you want to do more than play videos, you may not like LibreELEC.
Alternatives to LibreELEC
There are two main alternatives to LibreELEC: OpenELEC and OSMC.
OpenELEC
OpenELEC is the original project that LibreELEC was “forked” off from. Just like LibreELEC, OpenELEC is an extremely lightweight Linux distribution designed to run Kodi quickly and efficiently.
Before LibreELEC was released, OpenELEC was the “gold standard” for single-board HTPCs. Today, however, LibreELEC is much more popular than the original OpenELEC OS.
The primary reason for this is simple – OpenELEC does not have as many active developers, and the community is shrinking because of that.
This means that updates are few and far between. LibreELEC developers typically put out updates right after major Kodi releases come out.
For example, LibreELEC was constantly being updated with Alpha and Beta versions of Kodi 17 Krypton during development, and they also released a full version of LibreElec that supported Kodi 17 Krypton less than two weeks after it was officially released.
In contrast, it took OpenElec until April 30 to release a full version that supported Kodi 17 Krypton. However, even though the OpenELEC team takes longer to push out updates, OpenELEC still works just fine. OpenELEC's features are nearly identical to LibreELEC's and both operating systems are equally easy to use.
Another key benefit that LibreELEC has is that LibreELEC has its own installer. You have to download the OpenELEC image yourself an use a 3rd party tool to install it.
OSMC
If you’re looking for a lightweight OS that’s Kodi focused but provides you with more customizability and functionality, you may be interested in OSMC: The Open Source Media Center.
OSMC is a Debian-based Linux distro that is built to work with Kodi. Like LibreELEC and OpenELEC, OSMC boots directly into Kodi. However, OSMC has more Linux features compared to LibreElec and OpenElec. With OSMC, you can easily set up a Plex server, a web server, and more. If you’re interested in a more fully-featured HTPC, OSMC is a great choice.
Unfortunately, OSMC only works with Raspberry Pi devices. If you’re using a WeTek box or an Odroid C2, you won’t be able to use OSMC. Still, OSMC is a good alternative to LibreElec for cord-cutters who are familiar with Linux and are interested in customizing their HTPC.
Run a Kodi operating system from your USB thumb drive
The average "fully loaded" Kodi box sells for about $150 USD. But why buy from a dealer if you can make one yourself? If you have a decent thumb drive, you already have all the equipment you need to convert any computer into a DIY Kodi box.
Kodi based operating systems are super fast
Mac OS, Windows and other heavy duty operating systems are notorious resource hogs. The more you use your operating system, the more it tends to slow down and fill up with files you don't need.
If you make a bootable USB stick using KodiBuntu or OpenElec, you'll enjoy speedy, lag-free performance again. All you need to do is plug in your thumb drive and restart your computer. Best of all, you don't even have to delete your main operating system.
Can I boot my Kodi live USB via my TV's USB port?
No. You might be able to see the files that you stored to your USB stick, but you won't be able to boot directly into KodiBuntu or OpenElec using a smart TV.
So then, why bother?
As mentioned above, Kodi operating systems are super fast. If you're a performance fiend, it's worth it to boot directly into a Kodi OS when you want to watch TV for free. Plus, if you install directly to a Kodi live USB you can carry your Kodi entertainment system around with you wherever you go.
KodiBuntu vs. OpenElec
There are two main Kodi based operating systems: KodiBuntu and OpenElec. Here are a few facts you should know about them.
- They are both pretty much the same. Both KodiBuntu and OpenElec are totally free and equally easy to set up. Also, they are both based on linux-- a free open source operating system.
- OpenElec is slightly faster. Both KodiBuntu and OpenElec are quick. However, the OpenElec operating system is built for speed from the ground up. The creators of OpenElec specifically designed the operating system to consume the minimum amount of resources necessary to run Kodi.
- KodiBuntu is easier to modify and tweak. OpenElec runs Kodi and Kodi addons... and that's about it. But with KodiBuntu, you can close Kodi and access a bare bones linux desktop. From there you can open up the terminal and use the apt-get command to install additional linux programs if you want.
The live USB option
A live USB stick is a USB flash drive that contains a complete operating system. Both KodiBuntu and OpenElec are small enough to fit on an USB thumb drive. If you install to USB, you can pop in your USB when you want to use your Kodi operating system and pop it out when you want to use Windows or Mac OS.
Modern USB 3.0 compatible thumb drives are super cheap and just as fast as hard drives. But before you run out and buy a USB 3.0 compatible thumb drive, be sure that your computer has a USB 3.0 port.
Pros
- You don't have to configure dual booting or delete any files if you install to a USB.
- Performance will be just as fast or even faster compared to a hard drive installation if you've got a USB 3.0 port and a USB 3.0 thumb drive.
Cons
- If your computer doesn't have a USB 3.0 port, performance will be very slow.
Download the ISO file
The first thing you need to do if you want to install Kodibuntu or OpenElec is download the most recent ISO file for whichever OS you want to install.
An ISO image is a digital copy of a DVD or CD. If you have an ISO file and an ISO player, you can install an operating system without having to mess around with DVDs or CDs.
32 bit vs 64 bit operating systems
Both KodiBuntu and OpenElec come in 64 bit and 32 bit flavors. The 64 bit versions run a bit faster, but you'll need to have 64 bit compatible hardware to run them. If your computer was built before 2010, it may or may not be 64 bit compatible. But if your computer is less than 5 years old, get the 64 bit version.
Nothing bad will happen if you try to install a 64 bit Kodi OS on a 32 bit machine-- you just won't be able to complete the installation. But to avoid wasting time, Google your computer's model number to find out if it can handle 64 bit operating systems first before you proceed.
Click here to get the latest KodiBuntu ISO and here to get the newest edition of OpenElec.
How to create a KodiBuntu live USB stick
Windows
If you've got Windows, creating a bootable KodiBuntu USB stick is easy. All you need to do is download the KodiBuntu ISO and Linux Live USB Creator.
The first few minutes of the excellent video below shows you what KodiBuntu looks like. The second half (starting around 2:38) walks you through each step of the installation process.
Mac OS
The video below shows you how to use Mac Linux USB loader, which is the Mac OS version of Linux Live USB Creator.
How to create an OpenElec live USB stick
Windows
Check out the video below to find out how to use Win32 Disk Imager to create an OpenElec live USB stick.
Mac OS
Because OpenElec and KodiBuntu are both linux operating systems, the steps you need to follow to create a live USB stick on mac are virtually identical. The best tool for the job is Mac Linux USB loader.
Direct-to-hard-drive installation
If you've got no particular reason to keep your operating system because all you plan to do with your computer is play media files, you might as well delete it and replace it with KodiBuntu or OpenElec. The whole process only takes a few minutes if you've already made a live USB stick. Just opt to install KodiBuntu or OpenElec instead of boot up the OS when you turn on your computer.
Remember to back up your files
Once you wipe out your main operating system, all the files on your computer will be gone. If there's nothing on your old computer that you need, then you don't have anything to worry about. But if it does contain files that you may use later, you may want to move them over to a spare USB hard drive first before you proceed. Alternatively, you can use a cloud based file storage service like Google Drive to do a quick backup if the files you want don't take up much space.
How to make a portable Kodi USB drive
If you like the idea of taking Kodi with you wherever you go but you don't want to be able to switch to an all-purpose OS, you can use Windows to make a portable Kodi installation. Just open up the Kodi installer and change the installation drive to your thumb drive.
Once the Kodi shortcut appears on your desktop, open up the shortcut's settings and enter "P:\Kodi\kodi.exe -p" in the target field. The "-p" flag tells Kodi to install all addon files to your USB instead of elsewhere on your computer.


Alex Munkachy • Author
Alex Munkachy is a freelance writer, game developer and hobby robotics enthusiast.

Davan Hamilton • Editor
Davan Hamilton is an editor and writer based in Jacksonville, FL. Holding a degree in Interdisciplinary Studies, her writing spans a wide range, from essays on film criticism and analysis to surreal poetry. Now, she works for Flixed as an editor, continuing to ignore the list of passion projects she’s accumulated. When she’s not glued to her computer, you can find her building endless amounts of Lego sets, binge-reading manga, or playing with (fighting) her cat.
How To Watch


Flixed.io's contributors and editorial team will often recommend products we believe to be useful for our readers. We may receive an affiliate commission from product sales generated through these affiliate links.